Wednesday, November 25, 2015

The final Polymorph Products so far !

These are a few that have finished - and there is lots more to come !


The Polymorph process...

We have had lots of questions about how we approached the polymorph topic so here are some screen shots and pix of the book work....

 We "played" with the polymorph to work out its capabilities and limitations and then thought of possible ideas for its use


Then we thought of a person who we might like to make something for


Worked out the need ?


Came up with a series of ideas then chose one !


More possible design ideas on the theme


 Thought about the packaging


Designed a final packaging idea


Created a shopping list of materials - all re cycled !


MBots

We have got some new MBots and are having to put them together before we play with them.
They say a picture is worth a 1000 words so here goes ...

Mr Young joined Miss Chester and the children and put his MBot together with everyone else.


Tuesday, November 3, 2015

Video Clips Update

Since we have got back from ULEARN 2015 where we presented 2 workshops with the 21 MVTV Crew on MVTV and Circuits - enjoy the journey - we have had numerous requests for video clips about the things we have been doing
So rather than put them in the different categories we have put them in here first so they are all together.. you will be able to look in each section and find them later though.

So..... here are the clips that were requested so far ...

Ulearn 2015 - we presented 2 workshops - great fun for everyone
https://youtu.be/rwNt9o80WCM

Ulearn comments from parents and teachers
https://youtu.be/3QEQxolt4d4

Raspberry Pies - these ones you DON'T eat
https://youtu.be/htZIgT3zWhI

Senior Brainboxes learning about circuits
https://youtu.be/VBbFEMq0y5w

Sewn Circuits with conductive thread
https://youtu.be/uNbrNaRG3u0

Skyping India (Production)
https://youtu.be/njiA0xhNFvM

Sewn Circuits 2 more progress
https://youtu.be/vLMCG0MaS58

Senior tech what we were doing along the way
https://youtu.be/pcuDhlaJsvs

Senior ToomBoom Animation -Animation 101
https://youtu.be/1sFtfFo58v0

ToonBoom finished animations that we showed in the production
https://youtu.be/BJo4iI3WQe0

Sunday, November 1, 2015

Ever heard of Polymorph ??

This term we are "playing" with polymorph.
Its a re useable, re cycleable and environmentally friendly plastic. It fits perfectly with our topic this term which is SUSTAINABILITY....
we needed to find a product that fitted this category and most importantly was a little bit different so POLYMORPH it was.
Its expensive - $70 a kilo but with a little bit of bargaining we got it to $50 a kilo so every child in the intermediate got 200 grams each - which is quite a lot.
Our idea was that they had to find a need and make it with polymorph. make a protoype and see how it came out. If it didn't work then simply put it back into hot water and it returns to a gel like consistancy and then re mould, re shape to your new design.
This way we don't waste anything!
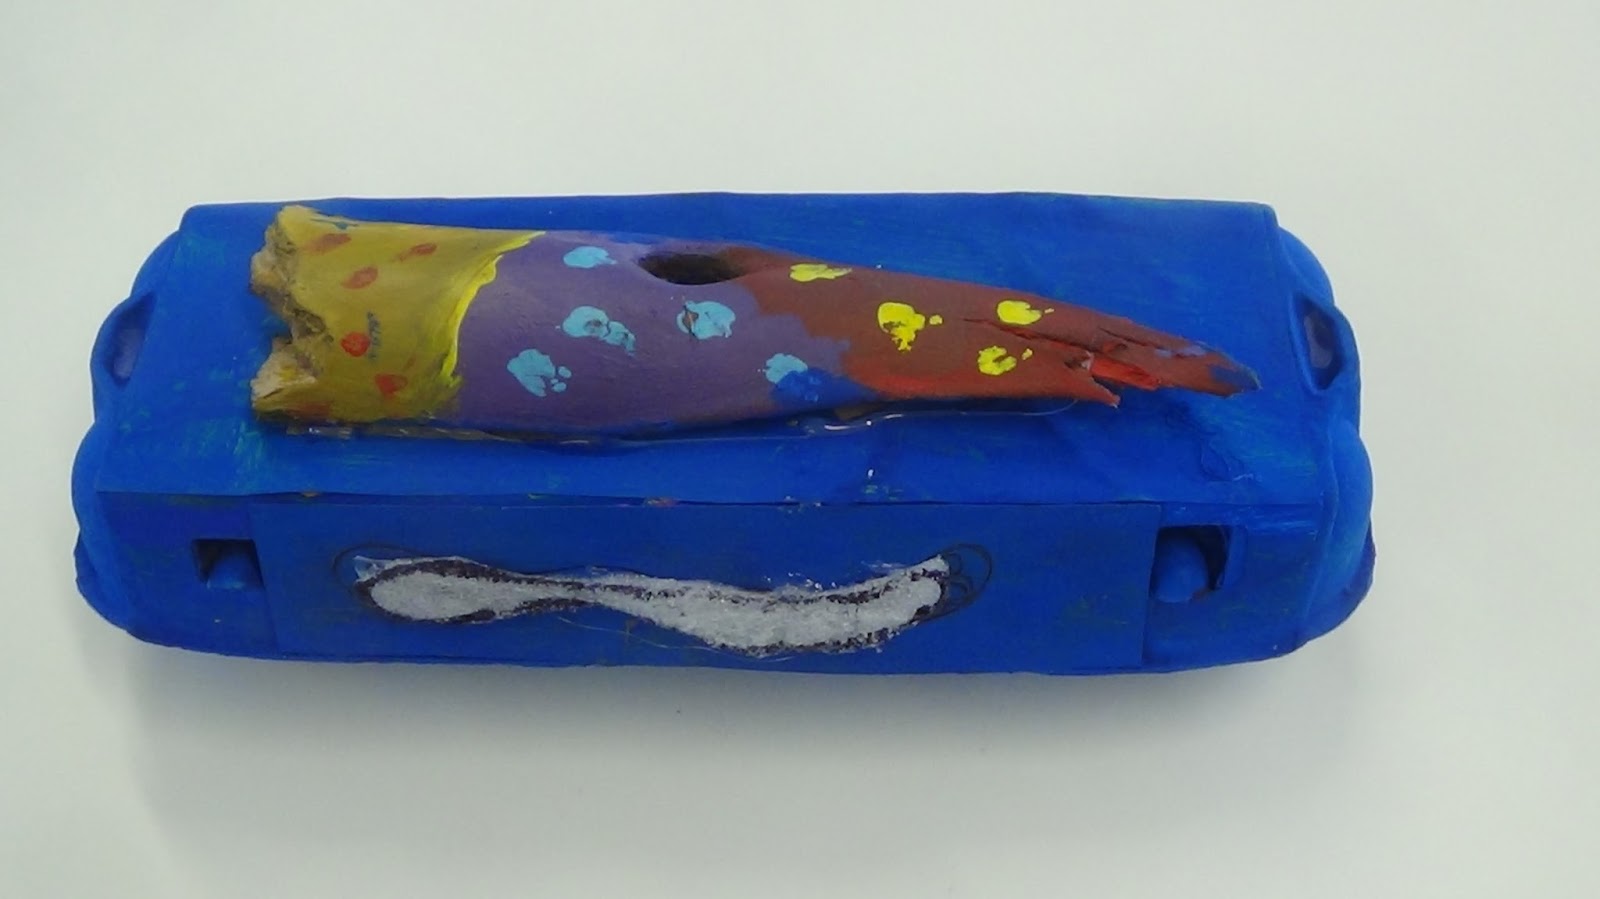
Right now we have got our design - it's been approved and we are fully into making the product !
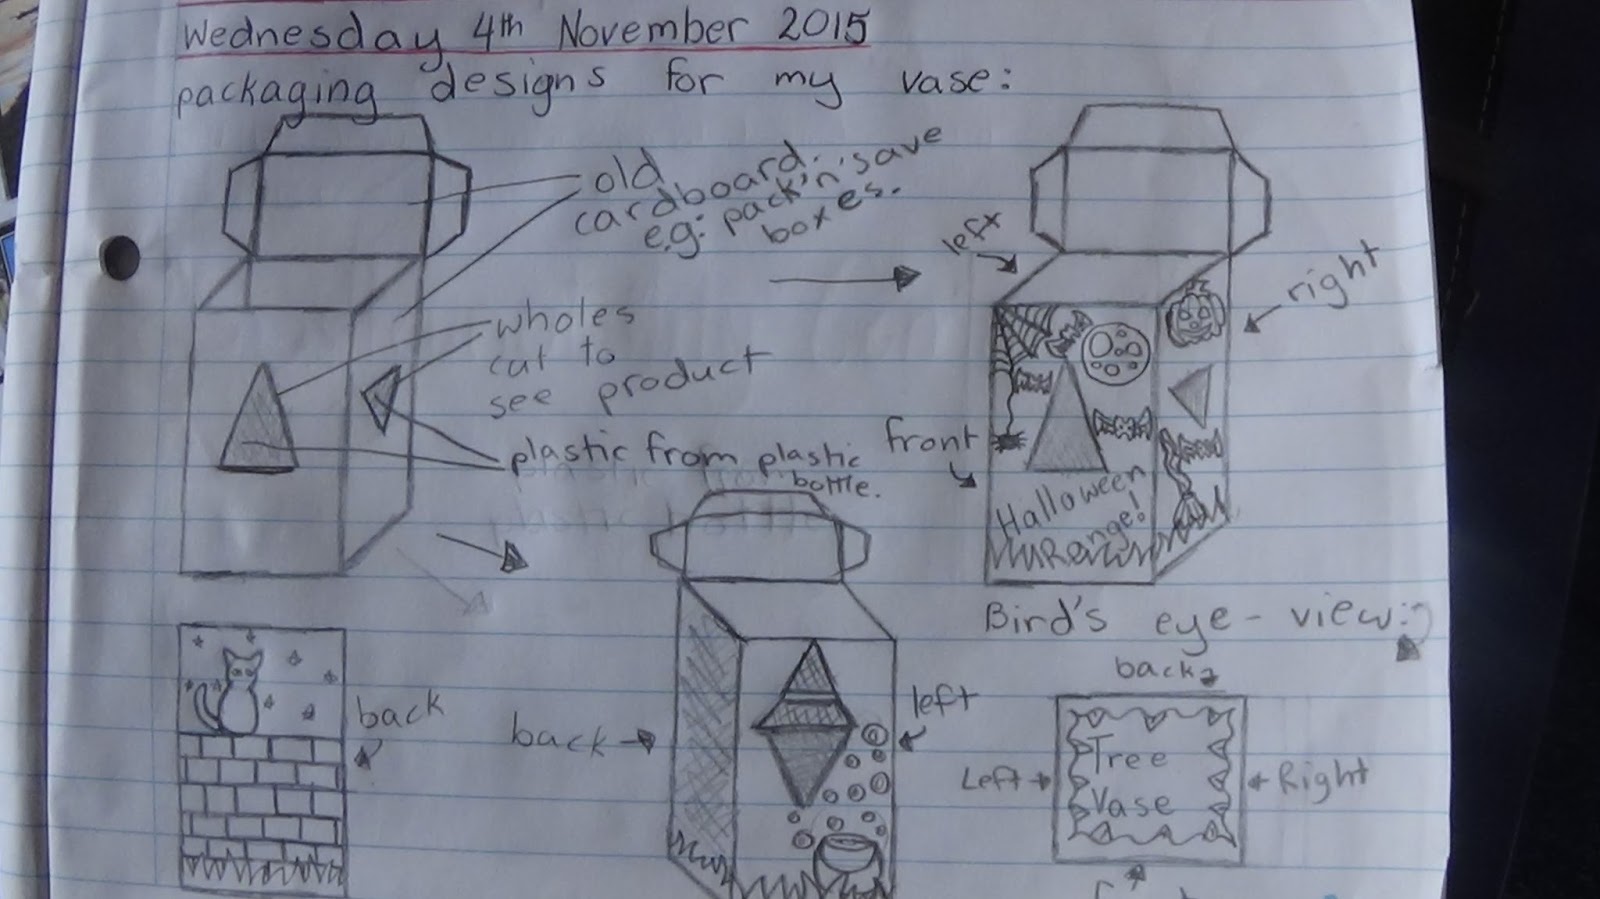
In our ideal world we have this finished in week 5 and then we make the recycled packaging to go with it !
But right now that is not going to happen as we want the children to design - make - critique - re design and re make until they are satisfied... and that will take time
So let's play !

Several things along the way we have learnt about polymorph !

We showed them how to melt it using hot water and that was great but after a while it begins to go hard so they rolled it into a ball !!

NO !!!!

FIRST MISTAKE !

So we spent the next lesson re melting it and it took heaps of time as the hot water takes time to penetrate the large mass..

....but this time we got them to make "biscuits" which are small bits that are very thin... which when needed were easy to re melt !

We used the microwave with a large ceramic bowl of water and that did it quicker - 3 minutes on high and then peel off the biscuits and store to go cool. You may need to do it 2 - 3 times but it works !

SECOND great thing we did !
our problem was keeping the water hot enough for long enough so we have used crock pots full of hot water and it works brilliantly.... just do not leave it in for too long !
last lesson we had children round the crock pot dipping biscuits to melt and then moulding their project item and adding bits as they go... making sure no surface area was any thicker than .5 of a cm so if it needed re modelling - melting etc then it was OK

We had conversations round the crock pot (slow cooker)  - much like round the water cooler at work !


Wednesday, October 28, 2015

Term Summary

 In term One students had to design something we could use. We used a website called Tinkercad. After the design process, we printed it to one of our 3D printing machines. It was an awesome way to make something! 

In Term Two our topic was “How things work”. We had to make a sewn circuit each. We used felt, conductive thread and LEDs. It had to be something we could use. It was an awesome topic because we learnt all about electrical circuits and positives and negatives.

In Term 3, we had the Production. Each class used a programme called Toonboom and drew a character from a country the class was studying. After we drew our character, we had to make the person do some moves. It was very cool, learning how to do an animation.

In Term 4, we used Polymorph to make an item that could help someone in need. It comes as little granules and when you put it in hot water in turns into a gel, and you can mould it into anything. But when it starts to go cold it turns in to a solid. If you want to re-use it you can put it back into hot water and it returns to a gel. Polymorph is an amazing product to use!


Catch ups !

We have been so busy we didn't have time to update our pages so here goes !

Our magazine page was great so here is a picture


Thursday, June 18, 2015

19 June 2015

Its now 4 weeks since we blogged and its been a very busy time.
Our 2 weeks of sewn circuits have gone to 4 weeks as we wanted the children to finish the project and be satisfied with the outcome.
We under estimated the time involved and thought maybe 3 weeks at the most. Some of the children still haven't finished after 4 weeks but not many.
On the positive side they look absolutely fantastic with lots of varied and different projects being completed. The variety of size, colour and ideas is great to see and as they were making them they were continually updating their ideas and adapting plans. The hardest thing for everyone was putting that practical wiring knowledge into practice. They had to create their own design then make a wiring diagram to fit into the space and then make it work.
Giving them more time to complete the project allowed the glitches and re wiring to be fixed so they had a finished product. So if you are contemplating doing this then allow heaps of time !
We have put in some pictures and a video to show you how we went.

Tuesday, May 19, 2015

18 May 2015

SEWN CIRCUITS

This 2 week module is all about sewn circuits and we will be making our own "piece" that has a sewn circuit in it.

Each child will have a square of felt, a button cell and holder, some conductive thread and 2 LED's

This week they will be reseaching for ides on what they can make so they are looking at Youtube for ideas and construction as well as looking at images of felt objects to see if they can make it but adapt it with a sewn circuit in it.

Some have already looked and come up with their own ideas so wee look forward to the next 2 weeks to see what is made

4 May 2015 - Making our own circuits

This 2 week block is a creative play module where they have to make a machine / robot to draw patterns on a piece of paper so the first step was to design the wiring diagram.

Once they had designed their circuit they had to make it. They had to solder all the wires together and to the motor and make a battery box for the batteries.

The first step was to learn how to use the soldering iron correctly and how to solder wires together and not burn themselves in the process !

In class they were designing and making the battery boxes ready for  the next lesson. This was not as easy as it sounds but there were some good construction going on and some great modifications being made !

Once we had it all working we needed to get a container of some sort for the robot body and attach the motor to it.

The next step was to make the "ROBOT DANCE!" - there was a lot of trial and error before we had some good dancers.

Now it was time to put on the felt tips and then the robots danced and drew patterns on the paper....

We will put the results up here once we have processed the videoes

Another successful 2 week module !

20th April 2015 - First day of Term 2

First period of the first day of term 2 and we were into it.
This is the start of the four 2 week modules where we look at different aspects of circuits.

Our topic is Circuits and the first 2 weeks will be doing just that. We have got the "Brainboxes" and we are just going over the basics first so the children understand what makes a circuit and how to construct them using motors lights and switches.
As they progress past these they can follow the experiments in the books - there are 188 of them so plenty of room for extension and consolidation of knowledge.
We finished off by designing our own using all the right symbols and then trying to make them with the Brainboxes.
The programme on the server called Crocodile Clips was a great way to test the circuits out on the computer before making them with the Brainboxes

Tuesday, March 17, 2015

Where do we start ?

We have been going hard out designing, drawing and printing so all three printers have been working overtime. We are continually amazed at the diversity and creativity of our children.
We have had motorbike parts, hinges,cases, Xbox bits, bag holders and many more designs printed so far.
Pictures will be posted soon !

Thursday, February 19, 2015

2015 - "We can make a difference"

We have a new topic this term and it is "We can make a difference"
In Tech we have decided that 4 weeks is a very short time to "make a difference" globally so we have decided to do just that but scale it to suit our time frame.

So this is what we are going to do.....
We will design, plan, measure, draw, and construct an item on the 3D printer that will make a difference to someone at home.
Remember it is the small things that count !
If you go to the 3D printing folder you can see what we plan to do...

Kian using Tinkercad

Navim on Tinkercad

Steven's hinge - first prototype

Now he takes it home to check !

Thursday, February 12, 2015

3D Printing

This term out topic is "Making a difference"

So we decided to use the 3D printers to "make a difference"

They are only little things but they are the ones that sometimes make a big difference to some people !

The Seniors have decided on a project, made drawings and discussed the solution, once it has been approved they have made a set of plans and drawings with very specific measurements.

They transfer that to Tinkercad and then prepared the 3D drawing for the printer....

We have lots of different projects on the go at the moment with Week Three being the time for the completed drawings ready for Tinkercad and then the 3D Printer files

Lots of work to do before it goes to print !!

And then there is our big project all the classes are doing !!!

MORE ON THAT LATER